Why Gutter Repair Is Necessary

Gutter Repair Baltimore is a necessary part of homeowner maintenance. Regular cleaning can help prevent clogs, leading to other problems that can be costly to fix.

While some gutter repairs can be done as a DIY project, it is recommended that a professional be hired for more extensive work, such as realignment and reinforcement.

Gutter sagging can lead to water overflowing the gutter, backing up under the fascia boards, and possibly seeping through the basement window wells or even into the home’s foundation. Fortunately, gutters can be repaired to restore their proper slope and prevent water damage. The first step is to examine the cause of sagging. It could be an accumulation of debris, or the gutters may be loose or damaged.

While performing your routine cleaning of the gutters, pay special attention to areas where the sagging is most prominent. These are likely the sections that need to be fixed. A close inspection will reveal the problem with the gutters, which is often due to missing or broken hangers or fasteners.

Gutter hangers are long metal clips that attach to the side of the gutter, holding it firmly to the fascia board. These are easily inspected and replaced from the ground or by climbing a ladder to inspect the gutters. Look for crooked, rusty or bent hangers that need to be replaced. Gutter hangers are typically made of aluminum, which is resistant to corrosion, but if the gutters are older they may be made of galvanized steel.

The other common cause of sagging is the downspout system. Whether it’s the downspout itself or the downspout outlet that’s blocked, this will cause the gutters to become extremely heavy. The gutters themselves are not able to support the excess weight and will begin to sag, especially in the area closest to the blockage.

If the downspout itself is the issue, a professional gutter company can install a new downspout that’s designed to drain water more efficiently than the old one. The gutters themselves can also be repaired to eliminate sagging by filling in holes or repairing damaged corners and seams with roofing cement. The gutters may also be re-leveled to correct the sagging if the issue is caused by a misaligned gutter system or improper installation. If the gutters are beyond repair, they may need to be replaced entirely. A professional gutter company can help you determine which options are the best for your home.

Loose or Damaged Fasteners

Gutters are an integral part of your home, helping to keep water from damaging the interior and exterior of your house. However, like many other aspects of your home, they are subject to wear and tear from everyday use and weathering. Over time, this can lead to damage, requiring you to make gutter repairs or even replace them entirely.

One of the most common causes of damage to gutters is loose or damaged fasteners. This is because a number of environmental factors can cause the fasteners to loosen, which can result in the deterioration or even the failure of your gutters.

The most common type of fastener used in gutter systems is the gutter spike, which consists of a metal spike that clips into the bottom of your gutter section and is then secured by a ferrule. Some homeowners may also use hangers, which are similar in nature to the spike but attach directly to the fascia board of your roof.

These fasteners can be loosened by over tightening, which can lead to stripped threads that will no longer hold the two components together. In addition to this, fasteners can become loose because of corrosive agents that attack them. The good news is that most fasteners can be saved by re-tightening or using non-destructive inspection techniques such as dye penetrant testing.
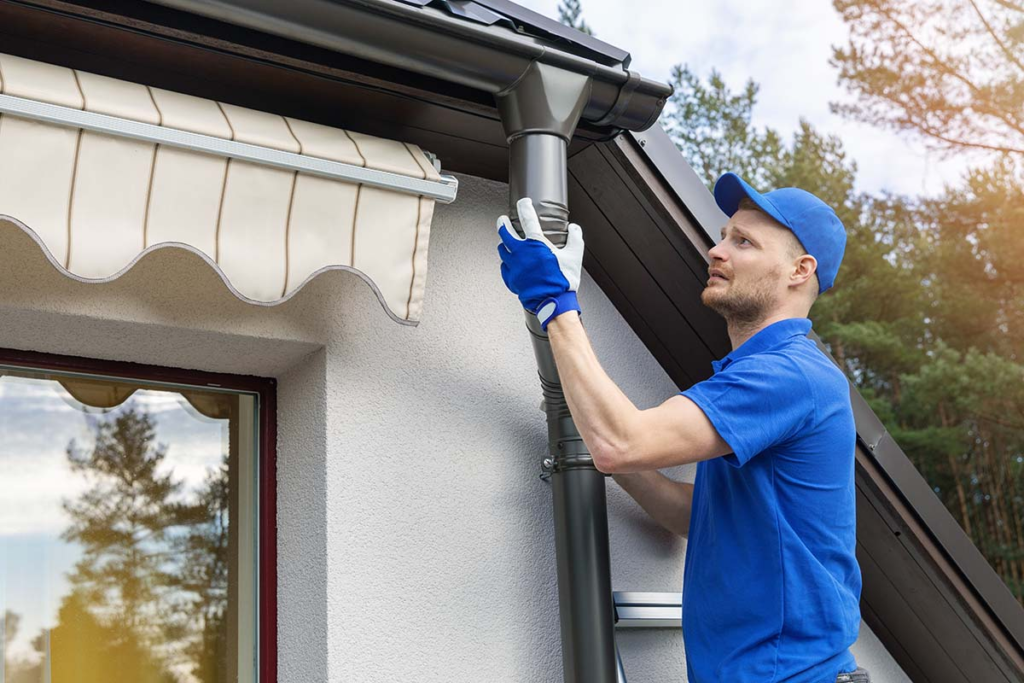
Dripping Downspouts

Gutter downspouts are designed to carry water away from a house. However, a downspout that is too small to handle the volume of rainwater it receives can overflow or even break from excessive stress. If this happens, your gutters may need to be extended. This is a relatively simple DIY project that can help ensure your gutter system works properly and protects the structure of your home.

If you’re noticing a dripping downspout, it’s important to find the source of the problem quickly before it escalates. The cause could be a number of issues, from rusted fasteners to loose brackets. To prevent the problem from spreading, it’s a good idea to inspect your gutters on a regular basis and make any necessary repairs immediately.

Dripping downspouts can often be repaired by using silicone caulk. Apply a thin bead of caulk to the joint where the downspout connects to the gutter. Be sure to clean the area before applying caulk, and it’s best if you do this project on a warm day so that it adheres well.

Downspouts can also become clogged with debris. This is a common problem that can lead to gutter overflow and other issues. You can often determine if your downspout is clogged by getting on a ladder after a rainstorm and tap down on it along its length. A clogged gutter will sound hollow, while one that is flowing freely will emit a higher-pitched noise.

In some cases, a downspout can simply be overflowing due to an improper pitch. If you notice that the water is moving faster than it should be, you may need to have the gutter re-pitched so that it’s pitched correctly to move the water away from the house.

Downspouts can also become tangled with trees and other debris. If this is the case, you may need to use a metal downspout extension to get the water to flow correctly. This is a relatively easy project that any homeowner can do on their own, and it’s a great way to ensure your gutters work properly and keep your home protected from costly foundation damage.
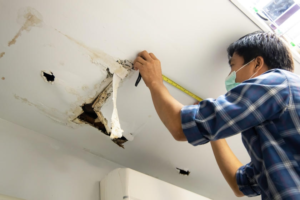
Damaged Gutters

Gutters that get damaged can be costly to repair and even more damaging if left unattended. Damaged gutters can lead to water leakage which, if not addressed promptly, can cause mold, wood rot and structural damage to the home or building. Damaged gutters can also encourage further deterioration through electrolytic corrosion, where the metal gradually etches away. Taking proactive steps to regularly inspect and clean your gutters while upgrading to gutter guards can help avoid this problem altogether.

Gutter guards are a good investment for homeowners as they can reduce debris build-up significantly, and can help keep your gutters looking like new for years to come. However, even with the best gutter guards in place, gutter repairs are often necessary as it is impossible to completely protect your gutters from weather and environmental factors that can lead to damage over time.

The most common types of damage to gutters include holes, cracks and rust. Gutter holes can occur when sharp branches fall against the gutters or through corrosion of the metal. Gutter cracks can happen through erosion of the gutter material, or when the gutter is pushed inwards due to sagging or loose sections. Rust can also weaken the gutter material, leading to further deterioration and damage.

Inspect the gutters for cracks and holes on a regular basis, especially after heavy storms or during the winter. Small cracks and holes can be repaired using a patch or sealant, and larger ones may need to be replaced.

If you spot a hole or crack in your gutters, first clean the area with a wire brush and a rag soaked in mineral spirits. Wearing leather work gloves, scrape off any rust that has formed around the hole. If the hole is in a section of your gutter that is not rusted through, you can use a sheet of wire screening and some roof cement to fix it.

If the hole is in a rusty section of gutter, you may need to replace that entire section. Depending on the type of gutter you have, this can be done with sleeve-and-spike supports, fascia brackets nailed to the face of the wall or strap hangers nailed to the gutter.

Pest Control Basics: Protecting Your Home from Unwanted Guests

Pests can transmit diseases to people and animals, destroy crops, and infest food supplies. Pest control is a necessary part of owning property.

pests

A good preventive maintenance program is the best way to avoid pest problems. If a problem occurs, a professional should be called in for treatment. Contact Armis Pest Management now!

Preventive pest control includes a series of strategies to prevent infestations from happening. These strategies are based on an understanding of the pests’ life cycles, behavior, and the environmental conditions that favor their growth and development. Prevention can involve a combination of tactics, including biological control, habitat manipulation, cultural modification, and resistant varieties. Monitoring is also a key part of preventative pest control. Monitoring helps identify pest population levels and determine when to take action if the pests reach unacceptable damage or nuisance levels.

In homes and businesses, preventive pest control measures typically aim to eliminate the food, water, and shelter sources that attract pests. This can include patching holes in walls, removing debris and clutter that provides shelter and hiding spots for pests, storing foods safely and regularly disposing of trash. It can also include sanitizing work areas, ensuring that shipments of food or other products are checked for pests before arriving at their destination and keeping doors shut as much as possible in commercial settings.

Natural methods of pest control are often effective, particularly for sporadic or localized pest problems. These can include biological control, which involves the introduction of organisms that suppress or kill pests, such as predatory insects, parasitic plants and pathogens. Biological control methods are generally non-toxic to humans and other organisms and are a good choice for environmentally sensitive areas or when chemical controls may not be suitable.

When chemical pesticides are necessary, they should be used judiciously and with care to minimize the risk of resistance and adverse health effects. This requires understanding the pests, their life cycle and environment, identifying the correct pesticide to use, and applying it correctly to avoid environmental contamination.

Integrated pest management (IPM) is an ecosystem-based strategy that uses the principles of prevention, monitoring, suppression and treatment to reduce or eliminate pests in agriculture and urban landscapes. It includes all the elements of preventative pest control, but goes further by utilizing a variety of techniques to reduce or eliminate the need for chemical controls, such as biological, physical and managerial approaches.

Suppression

Pest control strategies aim to prevent pest populations from rising above certain levels, called action thresholds. Thresholds are based on esthetic, health or economic considerations and may be set for insects, weeds or vertebrates. In outdoor settings, eradication is a rare goal; usually, it’s suppression that is desired. However, in enclosed environments such as homes and commercial buildings, eradication is a common goal.

Biological control uses living organisms to suppress or make less damaging pests, typically by attacking the pest directly. The organisms are natural enemies of the pest, such as predators, parasitoids or pathogens. To use a biological control agent, it must be obtained or made and then introduced into an environment where the pest is abundant, usually with careful attention to the timing of enemy and pest life cycles and to how the enemy will interact with other organisms in the new setting. Most biological control agents are not aimed at achieving a permanent population of natural enemies; instead, they are released in large numbers to quickly drop the pest population below the action threshold.

Pathogens, for example, can reduce pests by slowing or stopping their growth and reproduction. Insect pests often carry bacteria, fungi or protozoans that can reduce their rate of feeding, impair their movement and cause disease, sometimes even death. Disease-causing agents can also be injected into a pest to kill it or to force the insect to release eggs or sperm, resulting in sterile offspring that cannot reproduce.

Other biological controls are the result of genetic modification, as in gene drives that spread changes through a target insect population. The concept is that by knocking out genes that regulate spermatogenesis or other reproductive processes, the population will be forced to decline to lower equilibrium levels. For example, a gene drive could be used against the alfalfa weevil that has become a major pest in many areas of the US. The gene drive would change the gene that makes the wasp mate with any fertilized egg, producing only males in future generations (Dearden et al., 2017).

Detection

Pest detection is the first step in an effective pest control program. It involves identifying the presence of pests and often includes basic information such as the type, life cycle stage, physical characteristics and behavior patterns. Correct identification is critical because pesticides are more effective when they target specific pests. Also, a pesticide that is applied at the wrong time may not kill the pests or could cause damage to other organisms.

Detection of insect, insect-like, mollusk, vertebrate and some weed pests is normally done by trapping or visual inspection. In some cases, the environmental conditions such as temperature and moisture levels provide clues to when pest numbers will increase and reach action levels.

Many invasive pests, especially those that damage crops, are able to reproduce quickly in outdoor environments and must be controlled before they can spread. To prevent these pests from spreading, they must be detected and eradicated before they reach a threshold population level at which they will become economically or technically impractical to control. Early detection of exotic pests is crucial for the success of eradication programs and for suppressing established pest populations through biological, chemical or other integrated pest management techniques.

Sensor technology is available to monitor crop health and pest activity. These sensors can be used to capture and analyse a variety of data including electrical, chemical, electrochemical, optical, magnetic or vibrational signals. Sensors can be incorporated into farming equipment, such as tractors, or they can be deployed in field areas. They can be used to monitor the presence of pests in soil or in the air, and they can be used to identify and track crop diseases.

Image-based pest monitoring systems allow farmers to monitor the presence of a wide range of insects, plant diseases and other threats with high accuracy. Using advanced image processing, these systems can analyse and identify the presence of pests within a field with unprecedented speed and reliability. A recent experiment involved collecting images of six diverse pests (tobacco whiteflies, leaf miners, aphids, fruit flies, thrips and houseflies) in two greenhouses to develop an improved deep learning model for automatic pest detection. The model was then tested in the field and demonstrated high recognition accuracies.

Treatment

Once a pest has been identified and its presence determined, treatment is the act of eliminating it or reducing its numbers to an acceptable level. Treatment is a common goal of many pest control strategies and can include sanitation, exclusion, biological controls, and/or chemical applications.

Some pest problems can be eliminated by simply removing or closing off their entry points (exclusion). Infestations of weeds, some plant diseases, and wood-destroying insects can often be controlled by mowing or spraying them when they are small and before they have the opportunity to develop into major infestations (suppression).

Clutter in a dwelling or workplace provides breeding sites and hiding places for insects and also gives them a source of food. Eliminate stacks of newspapers, magazines, and cardboard, wipe down counters, and remove trash promptly. Caulking cracks and crevices and filling holes can help keep out pests, as well. Some plant-eating pests can be controlled with the introduction of beneficial insects, pathogens, or nematodes, which can kill or reduce their populations.

Integrated Pest Management, or IPM, is an ecosystem-based approach to controlling pests and their damage that emphasizes prevention through regular monitoring, manipulation of habitat, and modification of cultural practices. In IPM, pesticides are used only after monitoring indicates they are needed according to established guidelines and in a manner that minimizes risks to people, beneficial organisms, and the environment.

The goal of eradication is seldom sought in outdoor pest situations, but it may be possible in some cases with carefully designed programs. Some examples include eradication of Mediterranean fruit flies, gypsy moths, and fire ants.

Many pesticides work slowly, so they must be applied at just the right time in order to be effective. This is why it is important to know what kind of pest problem you have before you get a service call and why a service technician should always provide a written estimate and warranty before performing any treatments, especially preventative ones. It is also a good idea to have any pest control treatments performed by licensed professionals who are willing and able to provide you with documentation of their licenses and insurance.

Painting The Inside Of Cabinets Is Easy And Inexpensive

While Painting Inside Of Cabinets are personal decisions, many homeowners choose to do it to add a fresh look. For a durable finish that can hold up to everyday wear and tear, an alkyd-based paint is the best choice.

Cabinets

Begin by removing doors and drawers from their hinges. Place the hardware in labeled bags to make reattaching them easier.

Cabinet painting is a fairly easy and inexpensive way to give your kitchen a makeover. Most home improvement magazines, books and websites offer a lot of basic how-to tips. But what they fail to tell you is that proper surface preparation is the key to a successful cabinet paint job, inside and out. If you skip the prep work, you may be left with flaking or peeling paint, and if that happens, you’ll have to strip everything down to bare wood and start from scratch.

Before starting the actual painting process, clear out all contents of your cabinets. Usually, you don’t have to empty the drawers and cupboards, but if they are filled with food or cans of whatever, move them to a safe place where they won’t get in the way of your project. If you have to remove the hardware from the cabinets, make sure that you label each door and drawer so that you know where they go when it’s time to reinstall them.

Next, wash the cabinet surfaces and wipe them down with a degreasing cleaner such as trisodium phosphate (TSP) or a sponge. Be sure to scrub all corners and crevices. Rinse and dry all surfaces thoroughly. If your cabinets have a shiny finish, use 220-grit sandpaper to roughen the surface for better adhesion of the new primer and paint. Wipe down all surfaces again to remove any dust or residue.

It is also a good idea to cover your countertops, backsplash and floors with drop cloths or tarps to protect them from spills, drips and overspray. Using fans and keeping the windows open will keep the air moving, which will help the paint dry faster. Check the back of the can for the maximum recoat time; this is the amount of time that it will take for the paint to cure.

Once the first coat of primer is applied and has dried, apply a second coat. It’s important to let the second coat dry completely before applying the final topcoat, as this will help ensure a consistent and even color.

Primer

Whether your cabinets are wood or laminate, it’s best to prime them before you paint. This ensures that the new coat of paint adheres to the cabinet surface. Primer is also a great way to hide any minor blemishes and imperfections, making your final product look flawless. Before applying primer, scuff sand the cabinets to remove any sheen and create a smooth base for painting.

There are several types of primers available for kitchen cabinets, including oil-based, shellac-based, and water-based. Each has its own pros and cons. Oil-based primers provide a better seal and stain blocking properties, but emit strong fumes that require protective equipment and long drying times. Shellac-based primers are low in VOCs and dry quickly, but may not be as durable as latex or oil. Water-based primers are easy to work with and clean up easily, but they may not provide as good of an adhesion as oil-based primers.

If you are working with old or damaged cabinets, consider using a stain-blocking primer. These are particularly effective on cabinets with nicotine stains, water damage, or other severe discolorations. They are a great choice for anyone who wants their cabinet finish to last a long time.

Adhesion primers are ideal for slick surfaces like laminate or glossy paint, because they help to create a bond between the cabinet surface and new paint. They are usually a little more expensive than other types of primer, but can save you money in the long run by protecting your cabinets from peeling and chipping.

When choosing a primer for your cabinets, keep in mind that some products can take up to 16 hours to dry. To speed up the process, use fans and open windows to keep the air moving. Once your cabinets are ready, apply a second even coat of ADVANCE interior paint with a roller on flat surfaces and a brush for hard-to-reach areas. Wait at least overnight for the second coat to dry, and then sand with 220-grit sandpaper before finishing. This allows the finish to cure completely and prevents the topcoat from peeling or flaking prematurely.

Paint

Cabinet paint is specially formulated to stand up to the wear and tear of everyday use. It’s thicker than wall paint, providing extra protection against chipping and peeling. It also contains special adhesives that help it adhere to cabinet surfaces, which are often more slick than walls and can make it hard for regular wall paint to grip. Cabinet paints are available in a wide range of colors, and they’re designed to hide imperfections in the wood grain.

It’s important to select a high-quality cabinet paint for your project, as it will be exposed to more wear and tear than other surfaces in your home. Cabinets are often used for food prep, and they’re also subject to heat and moisture. The best cabinet paints will hold up to these conditions, and they’ll look beautiful for years to come.

If you’re not comfortable doing your own painting, or if you have a big project on your hands, consider hiring a professional. This will ensure that your cabinets are painted properly, and it will save you time and hassle. However, it’s important to do your homework before you hire a contractor. Look for a company with an excellent reputation and plenty of experience in the field.

When choosing a color for your cabinet doors, it’s recommended to opt for a satin or eggshell finish. This type of finish will be less noticeable than a glossy finish, and it will also be more forgiving when it comes to scuffs and fingerprints.

Before you start painting, it’s important to thoroughly clean your cabinets with a degreaser like TSP to remove grease and cooking residue from the surface. Then, sand the surface of your cabinets with a medium 300-400 grit sandpaper to smooth it out and create a clean canvas for your new coat of paint. After sanding, wipe down all surfaces with a damp cloth or lint-free tack cloth to remove any dust or debris.

It’s recommended to apply 2-3 coats of paint when painting cabinets. Allow each coat to dry fully between applications. It’s also important to follow the manufacturer’s instructions for drying times. Once the cabinets are dry, you can reinstall them and enjoy your newly painted kitchen!

Finish

Now that the cabinet interior has been lightly sanded, and you’ve applied your primer, it is time to apply your finish coat. Again, I suggest you use a high-quality acrylic latex paint for the best results. If you are sensitive to the stinky fumes from oil-based paint, consider using a water-based acrylic.

A good quality latex product will give you a smooth, durable finish that will stand up well to wear and tear. It will also hold up well to moisture and cleaning products. Use a velour roller for easy application to flat surfaces, and switch to a brush in the nooks and crannies. Make sure you have good air flow in your work area during this process, and keep the windows open.

There are many paint options for cabinets, from traditional oil-based paint to newer hybrid alkyds. Oil-based paints have a strong binder that makes them the hardiest choice for high touch areas, but they are difficult to clean and release volatile organic compounds (VOCs), which are not healthy for your kitchen. Water-based alkyd paints have become more common, and these are much easier to clean up, and they don’t release VOCs as quickly as oil paints.

For a durable, washable finish, I recommend you use a semi-gloss or gloss paint. It will be more durable than eggshell or flat paint and will hold up better against scuff marks.

After you have rolled the last of your ADVANCE interior paint onto the cabinet boxes and doors, let it dry thoroughly. This is an important step that can’t be rushed. Depending on the humidity, this can take 24 hours or more.

When the paint is dry, you can put back your drawers and shelves. I recommend waiting at least 8 hours before you start placing things back in your cabinetry, to allow the paint to fully cure.

It’s a good idea to label your cabinet doors and drawers before you remove them from the cabinet boxes, so you know where everything goes when it is time to put them back. It is also a good idea to use a damp cloth to wipe down the cabinets before you place them back in, just to make sure that they are clean and free of any residue or dirt.

The Importance of Tree Pruning

Tree Pruning aims to promote the health, safety and beauty of a plant. Proper pruning techniques help prevent structural weakness from overgrowth or damage from storms.

Tree Pruning

Thinning, crown lifting and shaping are all part of tree pruning. Branches that rub together should be thinned to minimize risk of damage or disease.

Among the soaring skyscrapers and endless highways, trees are timeless sentinels that quietly shape our urban landscape. These green giants are often taken for granted, but their survival and flourishing require dedicated human intervention to survive the biotic and abiotic stresses of modern cities. That’s where Tree Pruning comes in.

When left unchecked, excessive growth can impede pedestrian and vehicle flow along sidewalks and roadways or damage the structural integrity of nearby buildings. Likewise, dead limbs and branches can cause a safety hazard for homeowners when they rub against the siding or roof of houses during harsh storms or even fall on their own. Our trained professionals can prune away these hazards to help keep you and your family safe.

In general, pruning should focus on the health and structure of the tree. This includes removal of insect or disease infested limbs, broken limbs, crowded limbs that interfere with light penetration or air movement, and limbs that rub against structures such as homes, fences, or power lines. Pruning to “open-up” a crown for view purposes or to reduce wind resistance is generally not needed, and pruning close to utility lines should only be done by certified line clearance professionals.

The best time of year to prune is during the winter, when the risk of weather extremes is minimized. Pruning at other times can increase the likelihood that wounds do not close properly, which can lead to reduced vigor and increased disease susceptibility. Some species of trees, such as oaks, are prone to wilt and other diseases that can be spread through open pruning wounds. It is therefore important to understand the type of pruning required by a particular species and the proper timing for each. A quality tree service will be able to advise you on the appropriate pruning schedule for your specific needs.

Aesthetics

A well-pruned tree is attractive and pleasing to the eye, making it an important part of a landscape design. Many gardens and yards are designed to be organic, naturalistic, or more formal, but a well-pruned tree can fit seamlessly into any style of landscape design. It can also be used to create a focal point that can tie the garden or landscape together.

Proper pruning is essential to ensure that trees look their best while promoting health and longevity. Aesthetic pruning, as practiced by experienced arborists, involves identifying the natural shape of a tree and trimming branches to enhance that natural form while keeping in mind the desired end result. This meticulous process combines the artistic skill of the pruner with the essence and structure of the tree to produce a visually appealing result that can increase curb appeal and property values.

When making a pruning cut, it is important to remove as much of the branch or limb as possible without leaving a stub or flush cutting. This is referred to as a “natural target cut” by arborists and refers to two key anatomical features of a tree or shrub: the branch bark ridge (BBR) and the branch collar. The BBR is the swollen area that occurs where a branch meets another limb or trunk. The branch collar is the swollen or bulged area at the base of the branch where it attaches to the tree.

Both of these structures serve as an anti-rot barrier and are critical to a tree’s ability to close wounds and prevent decay in the heartwood. By avoiding flush cuts that eliminate these anatomical structures, the pruning cut is more likely to be successful in closing the wound and preventing decay in the future.

For the best results, major shaping and structural pruning should be done during a tree’s dormant season, typically in late winter or early spring. This reduces stress on the tree and helps it to recover from pruning faster. A-Unlimited Tree Service LLC uses best practices and techniques to ensure that your trees are healthy, safe, and visually appealing.

Increased Sunlight

Tree Pruning allows more sunlight to get through the canopy, which makes trees grow healthier. It also encourages new growth and increases flowering. The increased sunlight exposure promotes photosynthesis, which is essential for the tree’s health.

It removes dead branches that detract from the beauty of a landscape and may be a safety hazard. Pruning will also prevent limbs from breaking and falling during storms, which can damage property or hurt people. Dead or damaged limbs can also be a habitat for pests and fungi, which spread diseases affecting the tree and its neighbors.

In addition, removing these limbs will help keep grass and other landscaping near the tree healthy. Too much foliage can block the sun from reaching these areas and cause them to wilt. The proper pruning techniques can eliminate this problem, ensuring that the soil and surrounding plants get all the sunlight they need to thrive.

The thinning of the canopy caused by Tree Pruning increases airflow inside the canopy, which reduces the chance of fungal disease and helps the tree dry more quickly after rain. It also allows the tree to better withstand heavy winds and snowfall.

Branches that hang over homes, carports, or driveways need to be pruned regularly to avoid being struck by vehicles or toppled by strong winds. In addition, overgrown limbs and branches can become tangled in power lines, which pose a risk for the safety of your family, friends, and pets. Pruning enables your yard to look its best by giving it a clean and polished look.

A well-trained Arborist knows how to prune the right limbs at the right time for the best results. For example, if you are growing fruit-bearing trees, it is important to prune during the winter or spring when new growth is occurring. This will help the plant direct its energy towards fruit production rather than branch growth.

Health

Many trees in urban areas are surrounded by structures that can interfere with them. Branches and limbs that hang too low or over buildings, streets, sidewalks, and power lines can pose safety hazards and must be removed. Well-maintained trees are less likely to create these kinds of problems.

Tree pruning services help maintain these trees in the proper balance for their surrounding environment. It also removes dead or diseased limbs to prevent insect infestation and spread of disease to other parts of the tree or nearby plants.

The removal of these limbs can also increase air circulation through the canopy to reduce insect populations, which will further promote healthy growth. Regular pruning can also limit the number of limbs that fall during storms, reducing the risk of property damage and personal injury.

Proper pruning techniques reduce the chances of decay in wounds by allowing tree bark to seal them. Wounds that are not sealed will allow water and fungi to reach the heartwood of the tree and cause decay. The use of wound dressings and paints have not been shown to speed up the tree’s ability to close these wounds and is not recommended.

Pruning can also encourage tree health by removing crowded branches, crossing or rubbing limbs, weak-angled limbs, thinning a dense crown, and eliminating double leaders on some species of shade trees. It can improve the structure of young trees by promoting proper branch development and removing suckers, which are vigorous growths from the base of older branches. It can also help prevent sagging or leaning trees by raising the limbs to the proper height for their intended use. In most cases, it is best to let the lower branches grow temporarily to increase trunk strength and to avoid removing the permanent limbs until they are at least 1 inch in diameter. This will allow the permanent branches to become stronger and more durable. It is also important to concentrate on removing rubbing, crossing and competing branches in the upper portion of the tree. Finally, it is helpful to eliminate thorny and spiny branches on certain species of shrubs, as these can also cause injuries.

Ceiling Repair Tips For Homeowners

Ceiling Repair Perth can be a daunting task for homeowners. However, addressing it in time minimizes the extent of the damage and the associated costs.

Cracking noises in the ceiling are often the result of natural shifting and settling. More severe cracking, however, may indicate structural issues and require a professional inspection.

Water damage is a common problem that can ruin homes, lead to mold growth, and cause illness. It can also cost thousands of dollars to repair. Regular maintenance and vigilance are key to keeping your home safe from this kind of damage. It is important to know the signs of water damage on your ceiling so that you can act quickly and address it effectively.

A leaking roof or a burst pipe are common causes of water damage to the ceiling. These leaks may be slow, but they will eventually rot the wood and weaken the structure of your house. They can also create discolored spots on the ceiling. Discolored water stains are caused by a chemical in the wood called tannins. These stains can be prevented by using a stain blocker when painting the damaged area.

Leaking ceilings often require immediate attention, and this includes the removal of any affected drywall. This is a complex task that requires a professional with experience in the field. Depending on the extent of the damage, it may be necessary to remove and replace the entire section of your ceiling.

Once the ceiling is dry, it is important to inspect it for any underlying problems that may need to be addressed. Cracks in the ceiling are common and can be caused by a variety of things including structural settling, temperature changes, or improper installation. While hairline cracks are merely cosmetic and can be repaired with joint compound or drywall mud, larger cracks are a serious issue that should be dealt with immediately.

Another common sign of a leaking ceiling is a damp or sagging floor beneath the affected area. In addition to causing damage to the ceiling and flooring, these damp areas can also lead to a mold infestation. Mold spores can be very dangerous to human health, and prolonged exposure can cause respiratory problems, rashes, headaches, dizziness, nausea, allergies, and more.

Structural Damage

Over time every home experiences wear and tear, including damage to the ceiling. As such, it’s important to be vigilant in addressing potential problems and ensuring the structural integrity of your ceiling. This includes regular inspections of the space and recognizing warning signs such as cracks, plaster damage, water damage or a sagging ceiling. In some cases, a homeowner’s insurance policy may cover part of the repair costs.

Hairline cracks in the ceiling are common, but it’s essential to determine whether or not they indicate a problem with your building structure. For example, a single, long crack may be indicative of normal settling, but multiple cracks in a concentrated area or cracks that travel down walls suggest serious structural issues and require professional attention. If the cracks appear in conjunction with a musty odor, this may indicate that a mold issue is present and needs to be addressed immediately.

A sagging ceiling is also a warning sign of serious issues and should be addressed immediately. This type of issue can occur due to a variety of reasons, including heavy furniture or fixtures above the ceiling, a weak support beam, or damage from water infiltration. A sagging ceiling can cause serious damage to the ceiling and other parts of your home if left unattended.

Other ceiling damage to look out for include popped drywall seams and nail holes, as well as water stains. Water stains on the ceiling are often caused by leaks or moisture, and it’s vital to identify the source of the water and address it as soon as possible to prevent further damage to your property.

The best way to prepare for possible ceiling repairs is by educating yourself on the common types of damage and what’s involved in repairing them. It’s also helpful to be familiar with the general cost of repair, which depends on the extent of the damage and the level of skill required for a repair. For instance, repairing a small hole will be cheaper than a full restoration of a decorative ceiling with cornices and crown molding.

Drywall Damage

No matter how careful you are with your home’s walls, damage is bound to happen at some point. Whether it’s a rogue chair leg during move-in or a rowdy crowd of kids at play, impact damage to drywall can leave dents and other marks that need repair before you can paint again.

Ceiling cracks are also a common issue that homeowners face, often due to house settling or structural problems. While hairline cracks can be cosmetically repaired with a little bit of joint compound or Spackle, more significant cracks will likely indicate underlying issues and require a professional to investigate and repair.

Moisture is another major cause of drywall damage. Exposure to water and high humidity can cause areas of the drywall to swell, which can lead to warping or bulging. If moisture damage to a drywall ceiling is not addressed quickly, it can lead to mold growth months after the repair and cost you more in both time and money.

Even a minor leak can wreak havoc on drywall, causing stains and discoloration that make it look damaged and old. If left untreated, the stains can also lead to water damage within the wall, which is more costly and dangerous than simply replacing the affected drywall.

Drywall patching is a relatively simple process, but it’s best left to the professionals. A contractor will remove the drywall, clean the area and repair any damaged spots, before covering it with new drywall and repainting.

For any dents or marks left behind, apply two to three coats of joint compound to the damaged area, using a small brush or roller. After the last coat, sand the area smooth. Afterwards, vacuum up any resulting drywall dust and wipe the surface down with a damp cloth, then touch up the paint with a bit of primer and a fresh coat of paint.

Another area where you may need to hire a pro is repairing or replacing a corner bead. A corner bead is an L-shaped piece of metal used to cover corners in drywall, making them invisible after joint compound has been applied. Over time, regular wear and tear can dent this bead, requiring you to take a hacksaw to the area to remove it and recreate the corner bead.

Mold

Mold growth in the ceiling can occur for many reasons, including leaky roofs, condensation and poorly insulated homes. It’s important to identify the cause and address it before attempting repairs, as mold can spread quickly and affect other areas of your home.

Mold spores are also known to trigger upper respiratory problems like sneezing and coughing, so you should have any symptom that you’re breathing in these spores addressed immediately. Mold and mildew grow best in damp conditions, so the ceiling is a prime location for these growths to develop.

Water damage to your ceiling can also cause stains on the walls and furniture. If your wallpaper or trims are affected, you may need to remove and replace them. If there is enough damage, the paint might also begin to crack or buckle.

Cracks on your ceiling are another common sign that it’s time to have a professional repair the problem. These cracks often form in areas of the home that are prone to moisture, such as bathrooms and bedrooms. In some cases, they can be covered by a simple coat of paint, but it’s always best to have them inspected and repaired by a qualified professional to ensure your safety and prevent further problems.

A musty smell is one of the most obvious signs that you have mold in your ceiling. Mold spores can be very difficult to see, so even if you don’t see any stains, there’s a good chance that there is a hidden problem.

If you suspect that there’s a problem, try running a moisture meter along the backside of your sheetrock. This will help you determine the extent of the problem and whether or not it requires a replacement of your ceiling. Moisture caused by condensation will usually not show up on a moisture meter, while leaky ceilings may register as wet.

In some situations, the presence of mold in your ceiling can be a good indication that there are other hidden leaks or structural issues in your home. However, in most cases the presence of mold will only require a repair of your ceiling and may not indicate any other types of damage.

The Basics of Life Insurance

Life Insurance provides peace of mind that your family will be financially secure if you pass away. It can be used to pay off debts, mortgages and car loans, or help cover funeral expenses.

Insurance

Most policies have a two-year contestable period, during which companies may review information you gave on your application. This process is called underwriting. Visit www.lifeinsuranceupstate.com to learn more.

The death benefit of life insurance is paid to your beneficiaries as a tax-free lump sum when you die. It is typically used to pay for final expenses and to provide a financial cushion for your loved ones after your death. In addition, some policies also pay a portion of the death benefit during your lifetime, allowing you to use it for other purposes, such as paying for healthcare expenses.

You can customize your life insurance policy by choosing a beneficiary and adding riders. Beneficiaries are typically your family members, but you can also name charities or other organizations as beneficiaries. If you want to leave a portion of the death benefit to a charitable organization, you should make sure that the charity’s full legal name and tax identification number are included in your beneficiary list. You should also communicate with your beneficiaries about the details of your life insurance policy, especially around major events such as marriage, births, and new jobs.

In some cases, the death benefit can be reduced if the insured dies during the two-year contestable period or from suicide. This is because the insurance company may review your information to see if you gave false or misleading information in the application process. If the insurance company finds that you did, they may refuse to pay out the death benefits.

If you choose a whole life insurance policy, the premiums that you pay each year accumulate as cash value. This is money that you can borrow against or withdraw partially, but it does not increase the overall value of the policy. In some situations, you can even cancel the policy and receive the total amount of your premiums back.

You can use the death benefit of your life insurance to pay for a variety of things, including debt repayment and investment for growth. You can also opt for an accelerated death benefit option, which gives you the ability to access some of the death benefit while still alive. This is often beneficial for people who are terminally ill or unable to perform two out of the six activities of daily living.

It pays a tax-free death benefit

Life insurance is an agreement between you and an insurance company that guarantees your beneficiaries a financial payout if you die. The payout is often equal to your coverage amount and can be used by your beneficiaries in any way they choose, such as paying for funeral costs, paying off debts, or making up for lost income. In addition to a death benefit, some policies offer additional benefits that you can access during your lifetime, like the ability to borrow against or invest in the policy’s cash value.

Generally, life insurance proceeds are not taxable to your beneficiaries. However, depending on your circumstances and the type of life insurance you have, there may be other tax considerations. You should consult with your tax advisor to understand the details of your situation.

Most people buy life insurance to provide financial security for their loved ones after they die. However, many of us forget that a life insurance policy can also provide protection against the unexpected. A recent study by LIMRA found that 44% of families would experience financial hardship within six months of a wage earner’s death. That’s why it’s important to shop for the best prices on burial insurance and final expense policies before purchasing a policy.

With term life insurance, there are usually no taxes due on the death benefit. This is because the death benefit is considered a gift from the policy owner to the beneficiary. However, permanent life insurance policies have additional tax considerations that can come into play when the beneficiary receives the death benefit. These include:

Term life insurance has few tax implications and is a good option for those who want to secure their family’s future by providing a death benefit and cash value that can be borrowed or invested. Permanent life insurance has a death benefit and a cash value that you can borrow or invest in, but the growth of the cash value is subject to taxes. In addition, some permanent life insurance policies have an accelerated death benefit rider that prepays all or part of the death benefit while you are still living if you have a terminal illness or specified disease.

It pays a tax-free cash value

A Life Insurance policy pays a specified amount of money, known as the death benefit, to your beneficiaries when you die. This money can help your family pay for funeral costs, debts, and other expenses. In most cases, the death benefits paid by Life Insurance are tax-free. However, it’s important to understand the different scenarios that can affect your tax situation. A life insurance adviser can help you figure out your unique situation and plan accordingly.

Permanent life insurance policies build cash value over time. This is a separate account that grows at either a fixed or variable interest rate, depending on the type of policy you choose. In addition, some permanent life insurance policies have sub-accounts where the cash value can be invested in a variety of investment options. This means your life insurance could potentially grow even more than the original premium you paid for it.

If you withdraw or borrow from your life insurance, the proceeds are taxable, but only to the extent that they exceed your policy’s “policy basis.” Your policy’s policy basis is equal to the sum of all premium payments you made for it. Amounts above the policy’s policy basis are taxable as ordinary income.

Whole life insurance policies are a popular form of permanent insurance that offers a guaranteed death benefit. These policies also offer a tax-deferred cash value that increases each year on a schedule set by the insurance company. This is usually accompanied by annual dividend payments, which are payments that the insurance company shares with policyholders from its profits.

A whole life insurance policy is a permanent contract that guarantees a certain death benefit to your beneficiaries in exchange for your regular premium payments. These payments can be made for a specific period of time, or they can be paid in lump sum at the end of the term, which is typically the insured’s lifetime. In either case, the death benefit is guaranteed to be paid to your beneficiaries, and there are many reasons why you might want to consider purchasing a whole life insurance policy.

It pays a tax-free cash surrender value

Many people own life insurance policies in order to provide financial security for their families. However, sometimes people decide that they no longer need the policy and want to get some of the money they paid in back. This is called a cash surrender value, and it’s a good idea to understand how this works before making any decisions.

The cash surrender value of a life insurance policy is the amount you will receive if you cancel your policy and surrender it to the insurer. This amount is determined by the policy’s accumulated cash value minus any surrender fees and minus any loans or withdrawals that have been made. Usually, the accumulated cash value will be closer to this amount when you are nearing the end of your policy.

Term life insurance policies do not accumulate any cash value, but permanent life insurance policies have a savings component that may grow slowly at first and then accelerate over time as the premiums are paid. The accumulated value can be used to pay the premiums, or it can be withdrawn as a tax-free cash sum. The accumulated cash can also be used to pay for any remaining death benefit after the death of the insured.

Whole life policies allow you to access the accumulated cash value while you’re alive, which is a great feature for anyone in a high tax bracket. You can use the cash to purchase a home, pay for children’s college expenses, or supplement your retirement income. If you’re considering this option, be sure to check with your life insurance provider about the possible tax implications.

When you withdraw cash from a life insurance policy, the amount that is taxable is any amount that exceeds your policy’s cost basis. This is because the money that you’re withdrawing is considered income and has already been taxed once. However, if you borrow against the policy, the amount that is taxable will be based on the interest that has accrued on the loan.

If you want to stop paying your life insurance premium, you can do so by submitting a form to the carrier or calling their customer service department. They will guide you through the process of surrendering your policy and receiving the cash surrender value. The carrier will typically pay this in a lump sum, though some may make periodic payments.

Why You Should Hire A Full Basement Repair Company

When you need work done on your basement, consider hiring a full Basement Repair Naperville IL company rather than a general contractor. These companies prioritize customer relationships and offer long-term maintenance.

This homeowner was having trouble with water seepage through her basement walls. After installing 126 feet of interior drainage, a waterproof paneling system, and a dehumidifier, she now has a clean, dry basement.

basement repair

Foundation Cracks

Foundation cracks are usually a sign of structural damage, but not all cracks are the same. Deciphering which cracks are harmful can save you a lot of money and time, ensure emergent cracks are repaired ASAP, and help you track the overall stability of your basement walls over the long haul.

Hairline cracks are common in poured concrete foundation walls and usually don’t cause a major problem as long as they don’t grow wider or allow water to leak into the basement. They often appear days or weeks after a foundation is installed and are caused by the natural shrinkage of the concrete.

Wider, horizontal foundation cracks are a serious concern and can be a sign of shifting soil and sinking. They can be caused by several factors, including poor construction of the foundation’s footings, moisture problems, or subpar grading.

If you notice a horizontal or diagonal crack in your foundation, it’s essential to get it fixed immediately. The best way to fix these cracks is to use a concrete epoxy injection kit. Start by cleaning the area around the crack, then widen the gap slightly with a chisel or angle grinder to give the epoxy more surface area for better adherence. Then, inject the polyurethane product into the crack until it’s filled, and follow the manufacturer’s instructions for drying. After the crack is filled, paint over it to seal out any remaining moisture and protect the foundation walls from further damage.

Waterproofing

A little water in a basement is normal and acceptable, but too much can cause structural damage and create an ideal breeding ground for mold. Addressing the problem early is key to avoiding more serious and costly repairs down the road. You may be able to waterproof the basement on your own with DIY products, but consider calling in a professional for more complicated solutions like sealing wide or uneven foundation cracks or installing an interior drainage system.

Interior waterproofing keeps moisture out of the basement by applying a sealant to walls or floors. This can be done by professionals or as a do-it-yourself project, but it must be applied after the basement is dry to avoid trapping moisture that could lead to mildew or mold growth. A more permanent solution is epoxy injections that repair cracks and gaps in the concrete walls and floor of the basement.

Exterior basement waterproofing is more difficult and time-consuming, but it can be the most effective. It can be accomplished by removing flowerbeds, lawns, and other landscaping that could direct water toward the house, making sure gutters are working properly, and grading the yard so it slopes away from the home. Adding a sump pump to the basement and sealing concrete surfaces can also help reduce moisture in the basement. The first step is to test for moisture transmission using a moisture meter or vapor transfer kit.

Sump Pump Installation

Sump pump installation is a wise investment for homeowners who live in areas prone to flooding. Even in homes that have never flooded before, frequent rainfall and extreme weather can lead to water damage and other problems. Having a way to move the water away from your home will prevent your basement from getting flooded and help keep moisture out of the walls, preventing staining and peeling.

Your professional plumber will dig a hole in your basement floor to install the sump pit or pump basin. They will then line the pit’s walls with a waterproof membrane to ensure that the drained water doesn’t seep into the surrounding soil. They will also install an exterior discharge line to eject the drained water from your property. This will protect against groundwater seepage and prevent the drained water from putting pressure on your foundation.

Next, they will plug the sump pump into a GFCI-protected receptacle and test it. The float switch in the pump should activate when it reaches a certain level and then turn off when the water is removed from the pit.

A check valve should be installed between the pump and the discharge pipe to prevent the drained water from draining back into the sump pump. Once everything is in place and ready to go, they will cover the hole and the area around the pump with concrete.

Carbon Fiber Reinforcement

Carbon fiber reinforcement is a relatively new solution in the basement repair industry, but it’s a game changer. It’s known for its exceptional tensile strength, which can be used to stabilize and straighten bowing walls and foundations that have lost their structural integrity. It’s also durable and won’t corrode, which makes it the ideal material for basement structural repair.

Carbon-fiber-reinforced polymers (CFRP), or carbon fiber composites, are a combination of two different materials: carbon fibers for strength and a matrix of thermoset plastic, such as epoxy resin, to hold them together. CFRP is used in a wide variety of applications, including concrete reinforcement, where it can be used to increase the load-bearing capacity of existing structures and prevent further deterioration.

It’s also used for repairing and strengthening concrete structures and components, including bridges, tunnels, buildings, and other infrastructure. This type of structural repair is particularly effective because it’s done on-site and requires minimal excavation or disturbance to the structure’s surface.

Our carbon fiber basement repair services are done with extreme care and precision. The experts at our company first conduct a thorough assessment of the affected area to determine the extent of the damage and how it can best be addressed. Then, the appropriate carbon fiber strips are applied to the wall, creating a strong bond that strengthens and stabilizes the wall. The process is fast, convenient, and efficient, allowing us to complete the repairs quickly so your basement can be back in use as soon as possible.

Wall Anchors Or Braces

Wall anchors and braces are used to support bowing basement walls, a problem that occurs when expansive soil puts pressure on the foundation. This pressure causes the walls to curve inward like an archer’s bow and can damage the home’s structural integrity.

The best way to prevent this damage is by securing your basement walls with a dependable wall anchor system. Our expert technicians install these systems by drilling holes into the basement wall and connecting steel rods to anchor brackets on the inside of the wall. These anchors then connect to pins that are drilled deep into stable soil. These anchors transfer foundation pressure away from the basement, halting the walls’ inward movement and straightening them over time.

There are two types of basement wall anchors: helical tieback anchors. Helical tieback anchors are perfect for a basement with limited interior access because they can be installed without excavating the yard. These anchors look like a corkscrew and work by applying opposite pressure to cancel out the hydrostatic forces that caused your basement walls to bow in the first place. The PowerBrace system is custom-fit to the height of your basement walls and secured with a bracket that attaches to floor joists and footings. These galvanized metal beams can be tightened over time to straighten and stabilize your bowing basement walls, preventing further damage and avoiding a costly full foundation replacement. Both these systems are backed by product and service warranties and a transferable lifetime guarantee.

Foundation Replacement

Foundation replacement is typically required when a home’s structural integrity is seriously compromised. This may be indicated by a large number of cracks in the basement walls, doors that are difficult to open or close, gaps developing in trim work, and/or serious sinking or tilting of the building.

When this type of problem is detected, a professional will often develop a plan to reinforce the foundation and reposition the building back into its original position. During this process, the foundation will be jacked up with hydraulic piers that are installed at strategic points underneath the building’s structure. These devices, which vary in size and shape (i.e. resistance push piers, helical piers, or slab piers), are designed to transfer the building’s weight from the unstable soil into the deeper, load-bearing soil or bedrock.

These types of permanent repairs can be the best way to stabilize a house’s foundation but are also the most expensive. This is because they involve digging underneath the home to install the support system, which requires extensive excavation work, and then pumping concrete or helical steel into the ground to reach the load-bearing soils or bedrock. For this reason, it is best to leave the job of repairing and replacing your foundation to a professional who can ensure that the new repair method adequately addresses the root cause of your problem. These professionals are typically able to provide long-term, cost-effective solutions by using engineered steel piering systems that can go much deeper than traditional methods.

Wilderness Essentials: Gear for the Hunt

Whether it’s your first hunt or fiftieth, the right gear can make all the difference. The hunting essentials you bring aren’t just items; they’re tools that empower your experience in the wild.

Hunting Essentials

Some are practical, like a safety harness to keep you secure in your tree stand or trash bags that can double as ground cloths for game meat after field dressing. Others are crucial to your survival, such as a headlamp and two reserve flashlights. Read on Best Mouth Call Turkey to learn more.

One of the most important items you’ll need when hunting is a knife. This essential tool is used for a variety of tasks including skinning game and field dressing animals. It can also be used to cut rope and help with various campsite tasks, such as preparing firewood or building shelters. In addition, a knife can be used for self-protection and as a deterrent against wild threats or in an emergency situation.

There are many different types of knives available on the market, making it essential to choose a model that meets your specific requirements. Factors such as blade shape, edge type and handle design will all influence your decision. A good hunting knife should be able to cater to your needs without being too heavy or bulky.

The blade shape is an important factor to consider, as it will determine the knife’s intended use. For example, a drop point is ideal for hunters looking to take on large-game such as deer. This knife style features a straight, deep blade that provides the strength needed to carve through tough muscle tissue.

A curved blade, on the other hand, is suitable for small-game and bird hunting. This type of blade has a curved, narrow point that makes it easy to separate meat from bone and flesh. It also works well for cleaning and filleting fish.

Another feature to look out for is a gut hook, which is a special type of knife designed to make it easier to remove an animal’s internal organs. It has a sharpened semi-circle ground into the topside of the spine and is useful for extending an incision made with a standard blade while keeping the organs out of harm’s way.

Aside from the blade shape, it is also vital to select a knife with an ergonomic and comfortable handle. This ensures that you’ll be able to comfortably hold and use the knife for long periods of time, especially during field dressing or when processing your catch. Look for a handle that is made from a durable material such as wood, rubber or leather and has a non-slip surface. You should also look out for a sheath that can be securely attached to your belt or backpack to keep the blade secure when you’re not using it. It’s also a good idea to bring along a knife care kit that contains cleaning and lubricating products to protect your blade and keep it in pristine condition.

Socks

Whether you’re on an all-day elk hunt or just walking from the car to camp, having comfortable feet is key to a good time. If you’ve ever had a blister or sore foot while hunting, then you know that it can ruin a trip. Good quality hiking and hunting socks are designed to prevent blisters, which means you can spend more time on the trail without having to worry about your feet.

Quality hiking and hunting socks are made from a variety of fabrics to create the right balance of durability, cushioning, moisture wicking, and temperature regulation. They are also typically designed to be lightweight, as backcountry hunters carry a heavy pack that places an extra burden on their back and feet. A great pair of socks will have a seamless toe construction that minimizes friction and rubbing, which can lead to blisters. They will also be breathable to help regulate your body temperature.

Many of the best hiking and hunting socks are made from a combination of natural and synthetic materials. This helps to ensure that the sock will be comfortable and lightweight while still providing the warmth and wicking properties of natural fibers. Wool socks are often considered the standard in hunting socks, as they are naturally odor-resistant and warm when wet. However, the wool that was used in socks of previous generations was itchy and thick, but today’s merino wool is both itch-free and very lightweight.

When selecting the type of sock to wear for your next hunt, be sure to consider the time of year. An active hunter will need a light, lightweight sock in the early season, while a more stationary hunter may need a heavier, warmer sock in the late season.

For a great pair of lightweight hunting socks, try the Darn Tough Full Cushion 2012. These are an excellent choice for any hunter as they provide cushion and warmth without being too bulky. They will fit perfectly in your boots and won’t bunch or slip. They’ll wick and dry quickly, keeping your feet cool in the early season heat and warm in the late season snow.

Sunglasses

As a hunter, your eyes are your most valuable asset. Protect your eyes from projectiles and the sun’s harmful UV rays with a pair of shatter-resistant glasses. Choose a pair with polarised lenses to help get rid of glare from snow, water and glass. The polarisation helps you see more clearly and distinguish your target from its environment, preventing visual fatigue.

Look for a pair of sunglasses with a frame made from durable, lightweight materials. These frames will not only offer durability but will also be comfortable for long hours afield. You will also want to find a pair with an adjustable nose pads and temple arms so that you can customize the fit and comfort of your sunglasses.

Sunglasses designed specifically for hunting include features like foam-padding to shield your eyes from dust and debris, a sweat-bar to minimize the amount of moisture that gets in your eyes and a single polarised lens to ensure that you have free, uninterrupted vision in bright sunlight. Choose a lens colour that will suit your conditions, for example green, brown or orange tinted lenses are ideal for bright sunny days while yellow lenses provide superb contrast in low light environments such as dusk or near dawn.

The best sunglasses for hunters have a secure, comfortable fit and will not slide down your face when you’re hiking or scrambling over craggy terrain. Elite eyewear fuses ergonomic design with grip tech, featuring textures on the arms and nose pads to prevent downward slippage. Multiple sizes from small to XXL to suit narrow, wide or oval faces, as well as RX availability for those with prescription lenses, are available so that you can find the perfect match for your facial proportions and hunting pursuits.

A sturdy wraparound style will be a good choice for cold weather, as nylon frames resist fogging better than plastic or polycarbonate. Consider a pair of sunglasses with an anti-reflective coating, as this will further reduce the chances of your lenses fogging up when you are active and sweating. Choose a pair of wraparound sunglasses that will work with your favourite hat to increase the likelihood of them staying put even as you hike, run or duck through terrain.

Headlamp

A headlamp is one of the most important pieces of equipment to carry when hunting. Not only does it provide hands-free lighting, but it also allows hunters to spot game in low light conditions. It’s critical to select a headlamp that offers a combination of features, including brightness, battery life, and beam type. The best headlamps for hunting are versatile and durable. They are designed to be used in various environments and withstand a variety of weather conditions. They should be easy to use and have a long battery life, as no one wants to run out of power in the middle of their hunt.

The Black Diamond Storm is a lightweight, waterproof headlamp that provides powerful lighting for hands-free navigation in the dark. It’s ideal for hunting in dense forests or for hiking in mountainous terrain. The headlamp uses Black Diamond’s Power Tap technology to easily transition between dim and full power, and it features brightness memory. The device also has red, green, and blue lighting options for different environmental conditions.

In addition to brightness, the MH2 is a great choice for hunting because it has several different lighting modes to suit your environment. It has a wide and tight beam, as well as a hidden strobe light. It also has a long battery life and a rugged design that can withstand drops.

Choosing the right headlamp for your specific needs can significantly improve your hunting experience. A quality headlamp will allow you to see your surroundings and avoid obstacles, while also providing hands-free lighting for aiming and handling your weapon. It’s important to select a headlamp that is comfortable to wear and doesn’t disturb your hunting partner. The device should also be easy to operate in the dark, especially while wearing gloves or using both hands for other tasks.

While the Energizer headlamp might not have as many lighting modes, it does offer an excellent combination of power and price. The Energizer headlamp is bright enough to illuminate an object up to 80m away, and it comes with three rechargeable AAA batteries that can last for hours in the low-power mode.

What Does a Plumber Do? Understanding the Role and Responsibilities

Plumbers install, repair, and maintain the pipes and fixtures that provide water for drinking, cooking, bathing, and washing. They also inspect and test plumbing systems to ensure compliance with local building codes.

Showers and baths would be cold without the plumbing industry, which protects people from several deadly diseases caused by contaminated water. It’s not a glamorous job, but it pays well. Click Visit Our Website to learn more.

Installation

plumbing

Plumbing systems take away waste, provide hot and cold water, and regulate indoor climate through pipes, valves, and fixtures. Plumbers install these systems in new construction and in existing homes and businesses. They may also repair or replace existing components. Some plumbers specialize in a particular aspect of plumbing, such as gas line installation or sewer system maintenance and repair.

Most plumbers learn their trade through a formal apprenticeship, which combines classroom instruction with paid on-the-job training. Others attend vocational schools that offer certificate programs in plumbing. A high school diploma or equivalent is required to apply for a plumbing apprenticeship. Many states require plumbers to be licensed, though the requirements vary by jurisdiction.

When installing a new plumbing system, plumbers start by assessing the space and ensuring that it can accommodate the necessary appliances and piping. They then lay down plastic sheeting to protect the floor and surrounding walls from debris and water damage. They then cut into the wall or floor to create a path for the new pipes, making sure not to weaken the framing with excessive force. Finally, they connect the piping and test the system to ensure it works properly.

One of the most common tasks plumbers perform is replacing or repairing sinks, toilets, and faucets. They may also adjust the height of showerheads and other fixtures to ensure proper water flow. When working with a new home, they may need to consult blueprints and building codes to ensure the new plumbing is installed correctly.

Plumbers sometimes work on older, or historic, plumbing systems that may require more attention and skill to repair. These systems may have corroded or broken pipes, clogged drains, or other problems that require unique solutions. When working on these systems, plumbers must be able to identify and repair problems quickly to prevent further damage or leaks. This may require them to use more advanced tools than standard plumbing supplies, such as electrical snakes and hydraulic lifts. These more specialized tools can be more expensive, but they allow plumbers to work on unique or historic plumbing systems safely and effectively.

Maintenance

Plumbers maintain and repair the piping, fixtures, and appliances that deliver potable water and remove waste from a home or business. Their job duties include replacing components, fixing leaks, and ensuring that the plumbing system meets all local codes and regulations. They also inspect and test systems to ensure they are functioning properly. In some cases, they may collaborate with construction teams or architects to ensure that the plumbing is integrated into the building’s structure and design.

Plumbers usually work on residential and commercial properties. Their responsibilities are similar to those of other tradespeople in the construction industry, such as carpenters and electricians. They may install entire plumbing systems for new buildings, or they might focus on a single fixture like a sink, toilet, or bathtub. They also might specialize in specific types of equipment, such as gas lines or medical-grade faucets.

In addition to installing and repairing plumbing fixtures, Plumbers also test and analyze the quality of water at a property. This helps them determine whether there are any issues with the water supply, such as mineral buildup or low water pressure. They might also test for other conditions, such as the presence of toxins or bacteria in the water, which could indicate that the plumbing needs to be replaced.

A plumbing maintenance crew might also clean drains and sewer lines, replace worn parts, and perform other tasks that keep a building’s water system functional and safe for its occupants. They may also help to determine the cause of any problems, such as high water bills or unexplained leaks, and recommend solutions.

Because plumbers work with hazardous materials and high-pressure systems, they must follow strict safety protocols to prevent accidents and injuries. This often means working outdoors in inclement weather, wearing protective gear, and securing tools safely. It can also mean working evenings and weekends to respond to emergency calls from customers. Many plumbers are self-employed, which can provide flexibility in their schedules and the opportunity to choose the projects that they want to take on.

Repair

When pipes begin to leak or crack, it is important that they are repaired right away. Plumbers use a variety of tools and techniques to repair leaky faucets, toilets, showers, and water heaters. Sometimes, they must remove and replace entire sections of pipe if they cannot be fixed. Plumbers also have the skills and knowledge to install new fixtures, such as sinks, toilets, and bathtubs.

Many homeowners try to fix their own plumbing issues, but this is usually a bad idea. A plumber has the training and experience to quickly diagnose and fix problems, saving you time and money in the long run.

Most residential plumbing repairs are relatively minor, but if the problem is severe, it can lead to costly damage and health hazards. It is important to contact a plumber as soon as possible when you notice signs of a problem, such as leaking pipes, toilets that don’t flush, or foul odors.

The main sewer line is an essential part of every home, and it’s not uncommon for it to get clogged. When this happens, it is likely that sewage will back up into the home, which can cause serious health problems. If you notice that your home’s drains are backing up frequently, it is a good idea to call a plumber for a sewer line inspection.

In addition to identifying the source of the problem, a plumber will be able to recommend a course of action and implement it. For example, if the problem is caused by tree roots, a plumber may be able to use hydro-jetting or hydro-steaming to clear the line without having to dig up the entire yard.

It is a good idea for all homeowners to learn basic plumbing maintenance and repairs. This can help them save money in the long run and feel more confident about handling small tasks on their own. It is also helpful to know how to shut off the water valves in case of an emergency. Having these skills will allow you to minimize the risk of plumbing emergencies and keep your family safe.

Troubleshooting

Whether it’s a dripping faucet or a clogged toilet, most homeowners will encounter a plumbing problem at some point. Understanding common plumbing issues and knowing when to call a plumber can save you time and money.

While it may seem like a plumbing issue is minor, many problems can escalate into larger-scale repairs if not addressed promptly. This is why it’s important to keep up with routine maintenance and inspections. A licensed plumber can help ensure that your plumbing system is functioning correctly and prevent future problems from arising.

Some common plumbing problems include clogged drains and toilets, leaky pipes, water heater issues and low water pressure. To fix these issues, plumbers use a variety of tools and techniques. A plumber with experience in these areas will be able to identify the source of the problem quickly and find a solution that’s right for you.

In addition to basic troubleshooting, plumbers also repair plumbing systems. This can include fixing broken fixtures, replacing damaged pipes and repairing or installing water heaters. They can also deal with sewer problems, such as clogged drains or backups. Sewage issues can be dangerous and require a professional plumber with the appropriate training and equipment to safely handle the job.

It’s important for a plumber to have good communication skills, especially when dealing with customers. They should be able to explain the problem and recommend solutions clearly and concisely. This will allow the customer to make an informed decision about what to do next.

Plumbers also need to have strong mechanical skills to understand how plumbing fixtures, pipes and appliances work. They often need to read blueprints and diagrams to understand the location of piping, valves and other hardware. This helps them determine where to make repairs and what parts are needed.

While it’s a good idea to learn as much as you can about your plumbing system, there are some issues that should always be left to a professional plumber. This includes clogged or overflowing drains, leaky pipes, corroded fixtures and other serious problems. Trying to tackle these problems on your own can be dangerous and lead to further damage. Keeping up with regular maintenance and inspections can help prevent these problems from occurring in the first place.

The Military Humvee

Humvee

The Humvee became the icon of half a dozen US military interventions. It moved soldiers reliably over long distances and was instantly recognisable to the public, thanks to Hollywood action movie superstar Arnold Schwarzenegger who had one in his garage with “Terminator” emblazoned on its flanks.

It could also climb a 60 percent slope or ford five feet of water. But it was easy prey for improvised explosive devices. Click the Military Humvee For Sale to learn more.

The History

The military Humvee may be best known to civilians as the lumbering, gas guzzling status symbol that is the Hummer, but it began life a much more practical vehicle. Originally conceived as a versatile modernisation of jeep trucks, the High Mobility Multipurpose Wheeled Vehicle or HMMWV (Humvee is a colloquialism) was launched in the early 1980s and quickly became the jack-of-all-trades workhorse the US Army needed.

At the time, the Army had a fleet of obsolete M151 jeeps that were struggling to cope with newer challenges in combat zones in Vietnam and later Afghanistan. The military even tried militarising civilian trucks but these proved to be ill-fitting.

In 1979 the Army drafted specifications for what it wanted in its next light service vehicle. These called for a tough, multipurpose workhorse capable of transporting a large payload and going anywhere on hostile terrain.

The HMMWV would have to be able to cross a 16-inch obstacle at its lowest point, wade through 5-foot deep water (with the proper fording kit) and traverse side slopes that might otherwise cause conventional 4X4 vehicles to topple over.

To counter the growing threat from roadside bombs, the military began by bolting armour plates to existing Humvees. These increased the protection offered to the crews who patrolled cities such as Ramadi and Fallujah, but added weight that slowed the vehicles down and exacerbated mechanical problems.

AM General realised that the key was a basic, robust design without reliance on electronic engine controls and other technologies that could be compromised by malware or jammed by directed microwaves or fry by an electromagnetic pulse from an atomic bomb. Its initial model used a 6.2L Detroit diesel engine that some criticised as being sluggish, but it was a simple, straightforward design that proved ideal for the task at hand.

The Design

Humvees are a little wider than your average Honda Civic, which gives them better stability when driving off-road. This is important, because the Humvee is often asked to go places that a Honda Civic would never dream of going. This includes sand dunes, open meadows and more. The Humvee’s engine is also completely waterproof, so it can drive under water when necessary.

The military used the revolutionary new vehicle in several wars, including Operation Just Cause in Panama and the Gulf War. It also served as the main ground transport vehicle in the Battle of Mogadishu during Operation Gothic Serpent in 1993. The vehicle was so successful that it eventually inspired a civilian version of the truck called the Hummer, which was popularized by actor Arnold Schwarzenegger.

AM General developed the HMMWV after the Army drafted specifications for a light utility vehicle. It was designed to replace the army’s fleet of M151 jeeps, M561 Gama Goats, Ford GPW command reconnaissance vehicles and other light trucks. The HMMWV was much larger than the old jeeps, capable of clearing 16 inches of dirt or sand under its lowest carriage point. It was also able to carry a payload of up to 2,500 pounds.

By the time of the invasion of Iraq, the HMMWV had established itself as the go-to workhorse for front-line soldiers. But as the threat of unconventional warfare took hold, it became clear that the aluminum body of a Humvee might as well be tissue paper in the face of small arms fire and roadside improvised explosive devices.

The HMMWV has evolved over the years to address these issues, but it remains a vital part of the military’s arsenal. The military is currently working on short-term and long-term replacements for the Humvee, including commercial off-the-shelf vehicles that are built to withstand IED attacks.

The Engine

The Military Humvee is a flat-top beast that has plowed through deserts, evaded detection by stealth bombers and jumped whole continents in transport aircraft. But its greatest challenge was on paved roads. This was the only time that a military vehicle was out of its element, and it resulted in the creation of a controversial road-legal SUV with a killer soundtrack and one of the most iconic names in car history.

The Humvee, which stands for High Mobility Multipurpose Wheeled Vehicle, has largely replaced old jeeps and other light utility vehicles in the military. It’s also been adapted for civilian use as the Hummer, and it has helped inspire other off-roading juggernauts like the Ford F-150 Raptor.

For years, a six-cylinder engine has powered the Humvee. The original 6.2L and subsequent upgrades have never been particularly powerful. One turbo 6.5L equipped Humvee that was tested on a Banks chassis dyno produced only 113 horsepower and 219 lb-ft of torque – not enough to make you a speed demon or even to get the tank off the ground in a hurry.

But despite its limitations, the Humvee remains an invaluable workhorse. It’s not just cheaper to build than the latest high-tech Joint Light Tactical Vehicle (JLTV), but it’s also more reliable. And it can carry more cargo and weapons than its modern-day counterparts. It’s financially and logistically impractical for the Army to mount its entire force in 70-ton M1 Abrams tanks, so the Humvee will remain a part of the arsenal for years to come.

The Transmission

The military’s H-Vee — also known as the HMMWV or M998A3 — is famous for its off-road capabilities, which have helped it supplant older light utility vehicles like the jeep. The HMMWV’s ruggedness inspired the creation of the civilian Hummer automotive marque, which became so popular that it even has an enthusiastic fan in Hollywood’s ultimate tough guy, Arnold Schwarzenegger.

While the HMMWV may be getting old by military standards, it’s still a potent off-road machine. It can easily clear 16” of dirt under its lowest point with a payload of 2,500 pounds and a useful automatic transmission. The vehicle can also traverse rocky hills, 60” of water, desert heat and arctic snow with ease, making it the perfect military truck for the most brutal terrain.

Another key feature of the HMMWV is its reliability. Unlike most modern vehicles, which can glitch or go dead when subjected to electromagnetic pulses (EMP), the Humvee is able to keep functioning in these situations. In fact, a former combat veteran doing a test drive with me was impressed that the Humvee would keep driving if we set off an EMP over South Bend.

In order to give the aging HMMWV some extra kick in the back, the 1st Armored Brigade Combat Team got an upfit of its vehicles by online heavy equipment auction site IronPlanet. The upfit included a new 700R4/4L-series transmission, along with a high-performance suspension system from race car builder Gale Banks. Banks has built his own off-road racers, including a Ford F-250 with a 700R4 and a GM 4L80E that competed in the Baja 1000. With this nimble upgrade, the Humvee looks more like a modern Jeep Wrangler Unlimited than an abused war machine.

The Armor

A Humvee is a familiar sight to anyone who has watched a military action in the modern era. It was the quintessential battlefield taxi that carried troops around during the Gulf wars and the war in Afghanistan. While the HMMWV is extremely versatile and durable, it had one ongoing weakness that proved to be fatal for many soldiers – it could not withstand roadside bombs.

The original HMMWV was never designed to perform as an armored combat vehicle. Its specifications focused on providing good cross country and road mobility, while keeping its empty weight low. This precluded armor, as it would have increased the vehicle’s empty weight, lowering its overall mobility standard.

However, the soft-skinned HMMWVs began to take heavy casualties from both enemy fire and roadside bombs in the Middle East. Soldiers in the 82nd Airborne and 101st Airborne units were especially vulnerable, as their vehicles often did not offer sufficient protection against 7.62 rounds from an AK-47 and RPGs. They had to rely on sandbags, plywood and cannibalized armour for protection in their soft-skinned trucks.

To solve this problem, the Army began to look at the possibility of up-armoring their HMMWVs. Aberdeen based AM General developed an armor kit called the Armor Survivability Kit (ASK) that included bulletproof windows and doors, adding about 1,000 pounds to an HMMWV. This significantly improved its ability to withstand small arms fire and roadside bombs, though it still could not withstand the much heavier and more powerful mines used in Iraq and Afghanistan.

In the end, the military replaced many of its Humvees with newer, more heavily-armored versions that were able to withstand mines and improvised explosive devices. This new type of frontline tactical vehicle is now known as the Joint Light Tactical Vehicle, or JLTV. While these newer vehicles are more advanced, AM General argues that it may not be worth it to move away from the tried-and-true workhorse that the Humvee is.